


This crusty, No Knead Artisan Bread is so easy to make in 3 hours or less and no kneading required. Toasted and buttered it’s irresistible!
There is only one thing in this world that I love more than a quiet night at home and a really good book, and that is a loaf of crusty, fragrant bread.
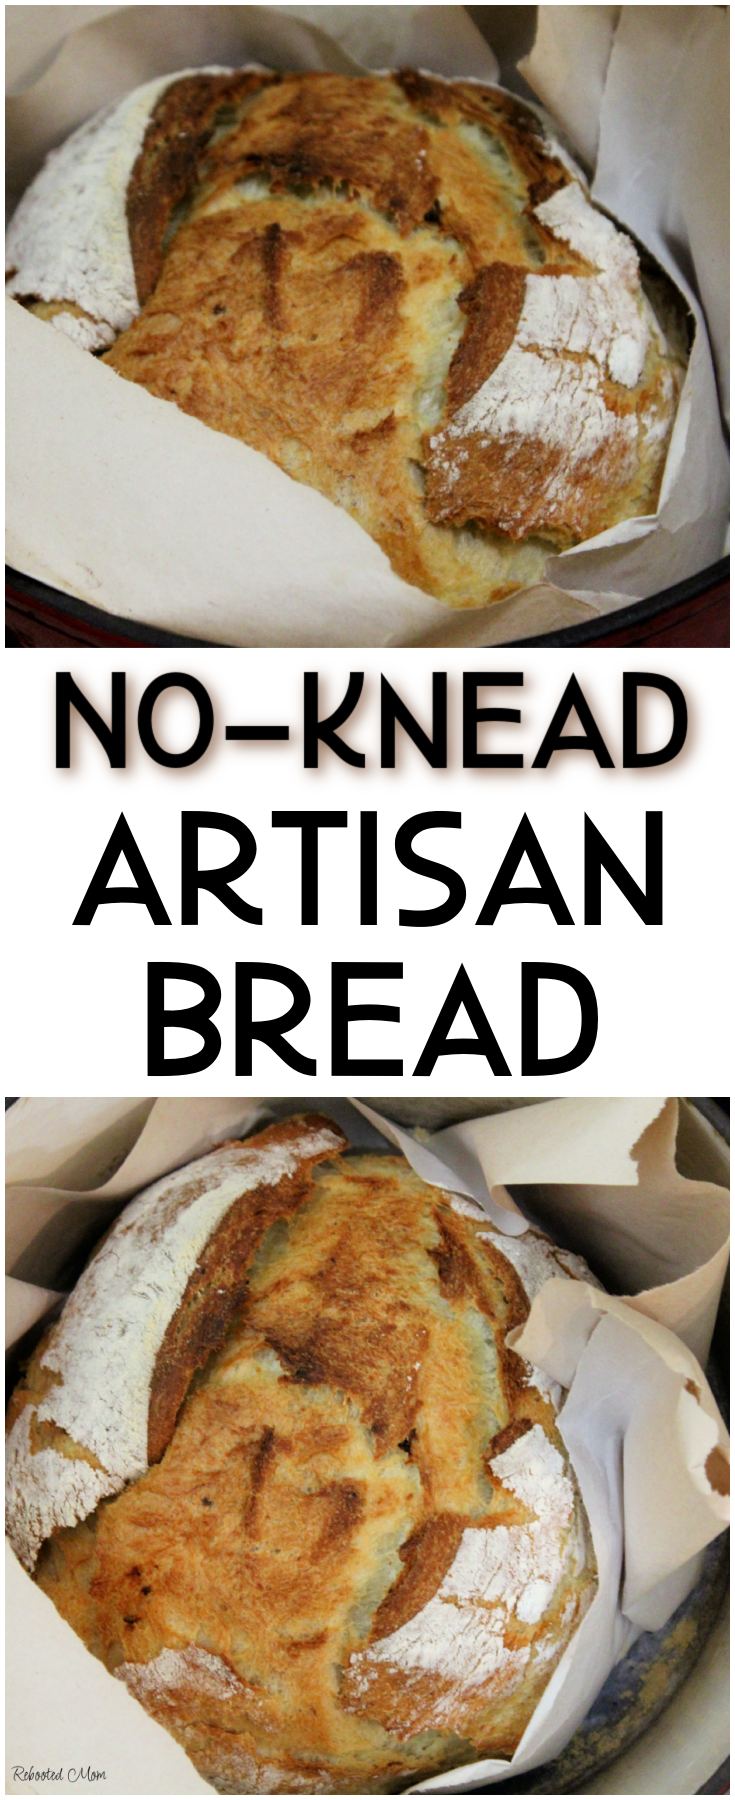
Not just plain bread, but a loaf with a deliciously crusty, golden exterior… and a soft, fluffy inside that exudes the smell of roasted garlic.
Take one whiff and you will be off to bread heaven. 🥰 Did you know there was a bread heaven? There most definitely is – and bread heaven wants you to smother a little butter all over that crusty bread.
Correction: Forget a little. What I really mean is gobs, and gobs of butter. 😉
In all seriousness though, this bread is just that great. So good indeed that five kids can devour the entire loaf as they dip and slurp their bowls of chili. The hard, crusty exterior makes it great for dipping in chili, too!
No Knead Artisan Bread
This warm, homemade, artisan bread that’s so full of flavor will be on your table in less than 3 hours – that’s a total win!
I’ve been making this bread (and variations of this bread) multiple times a week for the last few months. Nothing beats his fresh loaf coming out of the oven, toasted and smothered in butter or your favorite jam.
Or dip your thick, crusty yet chewy bread in your favorite bowl of homemade chicken noodle soup or chili for even more flavors.

HOW TO MAKE THIS ARTISAN BREAD
Making this homemade artisan bread is a breeze!
Sugar: Sugar feeds on sugar and starch; mixing in sugar helps the bread rise while baking. The bubbles will push the dough up and out creating a very fluffy bread with a wonderful texture.
Oil: Makes the bread softer. Without it, it will be a bit dry.
Warm water: Necessary to react with your yeast. Aim for a temp of 105 – 115 degrees F. It should be lukewarm. Too hot and it will kill your yeast.
Flour: Bread flour is strongly suggested for a softer, fluffier bread. However, I have used all purpose flour with great results, too. Make sure you spoon the flour into your measuring cup and level off the top for accurate measuring (or, use a scale to measure exact weights).
Yeast: Without yeast you don’t have this bread! You’ll add the yeast and sugar to warm water (aim for 105-115 degrees F). Sprinkle it on top and allow it to sit for 2-3 minutes to froth — if it doesn’t froth/bubble up after a short time, you’ll want to try with new yeast.
Add the water to the sugar in a large bowl. Sprinkle on the yeast and allow to sit for 2-3 minutes to froth. Then stir in the flour, salt, and oil.
Mix by hand just or with a dough hook in your KitchenAid just until it comes together. Place a piece of saran/plastic wrap over the bowl and allow it to rise (double in size) – somewhere between 1-2 hours.
Rise time: Can vary based on the temps of your home and temp of the water used for the yeast.
The texture of the dough will be very spongy, the top will be jiggly with bubbles. That’s ok! That is what it should look like!
TIME TO PREHEAT YOUR OVEN!
Toss your Dutch oven (and lid) in your oven and preheat to 450 degrees F for at least 30 minutes. While the oven is heating up, scrap out your dough onto a flat floured surface (counter top).
Sprinkle flour on top of the surface of the dough. Fold the dough over on itself like a letter. Then flip it over and form a rough, round shape. Measure some parchment paper for the pot that’s in the oven. Put the paper, smooth side up, next to the dough you just formed. Carefully lift the dough ball, after forming, onto the middle of the parchment.
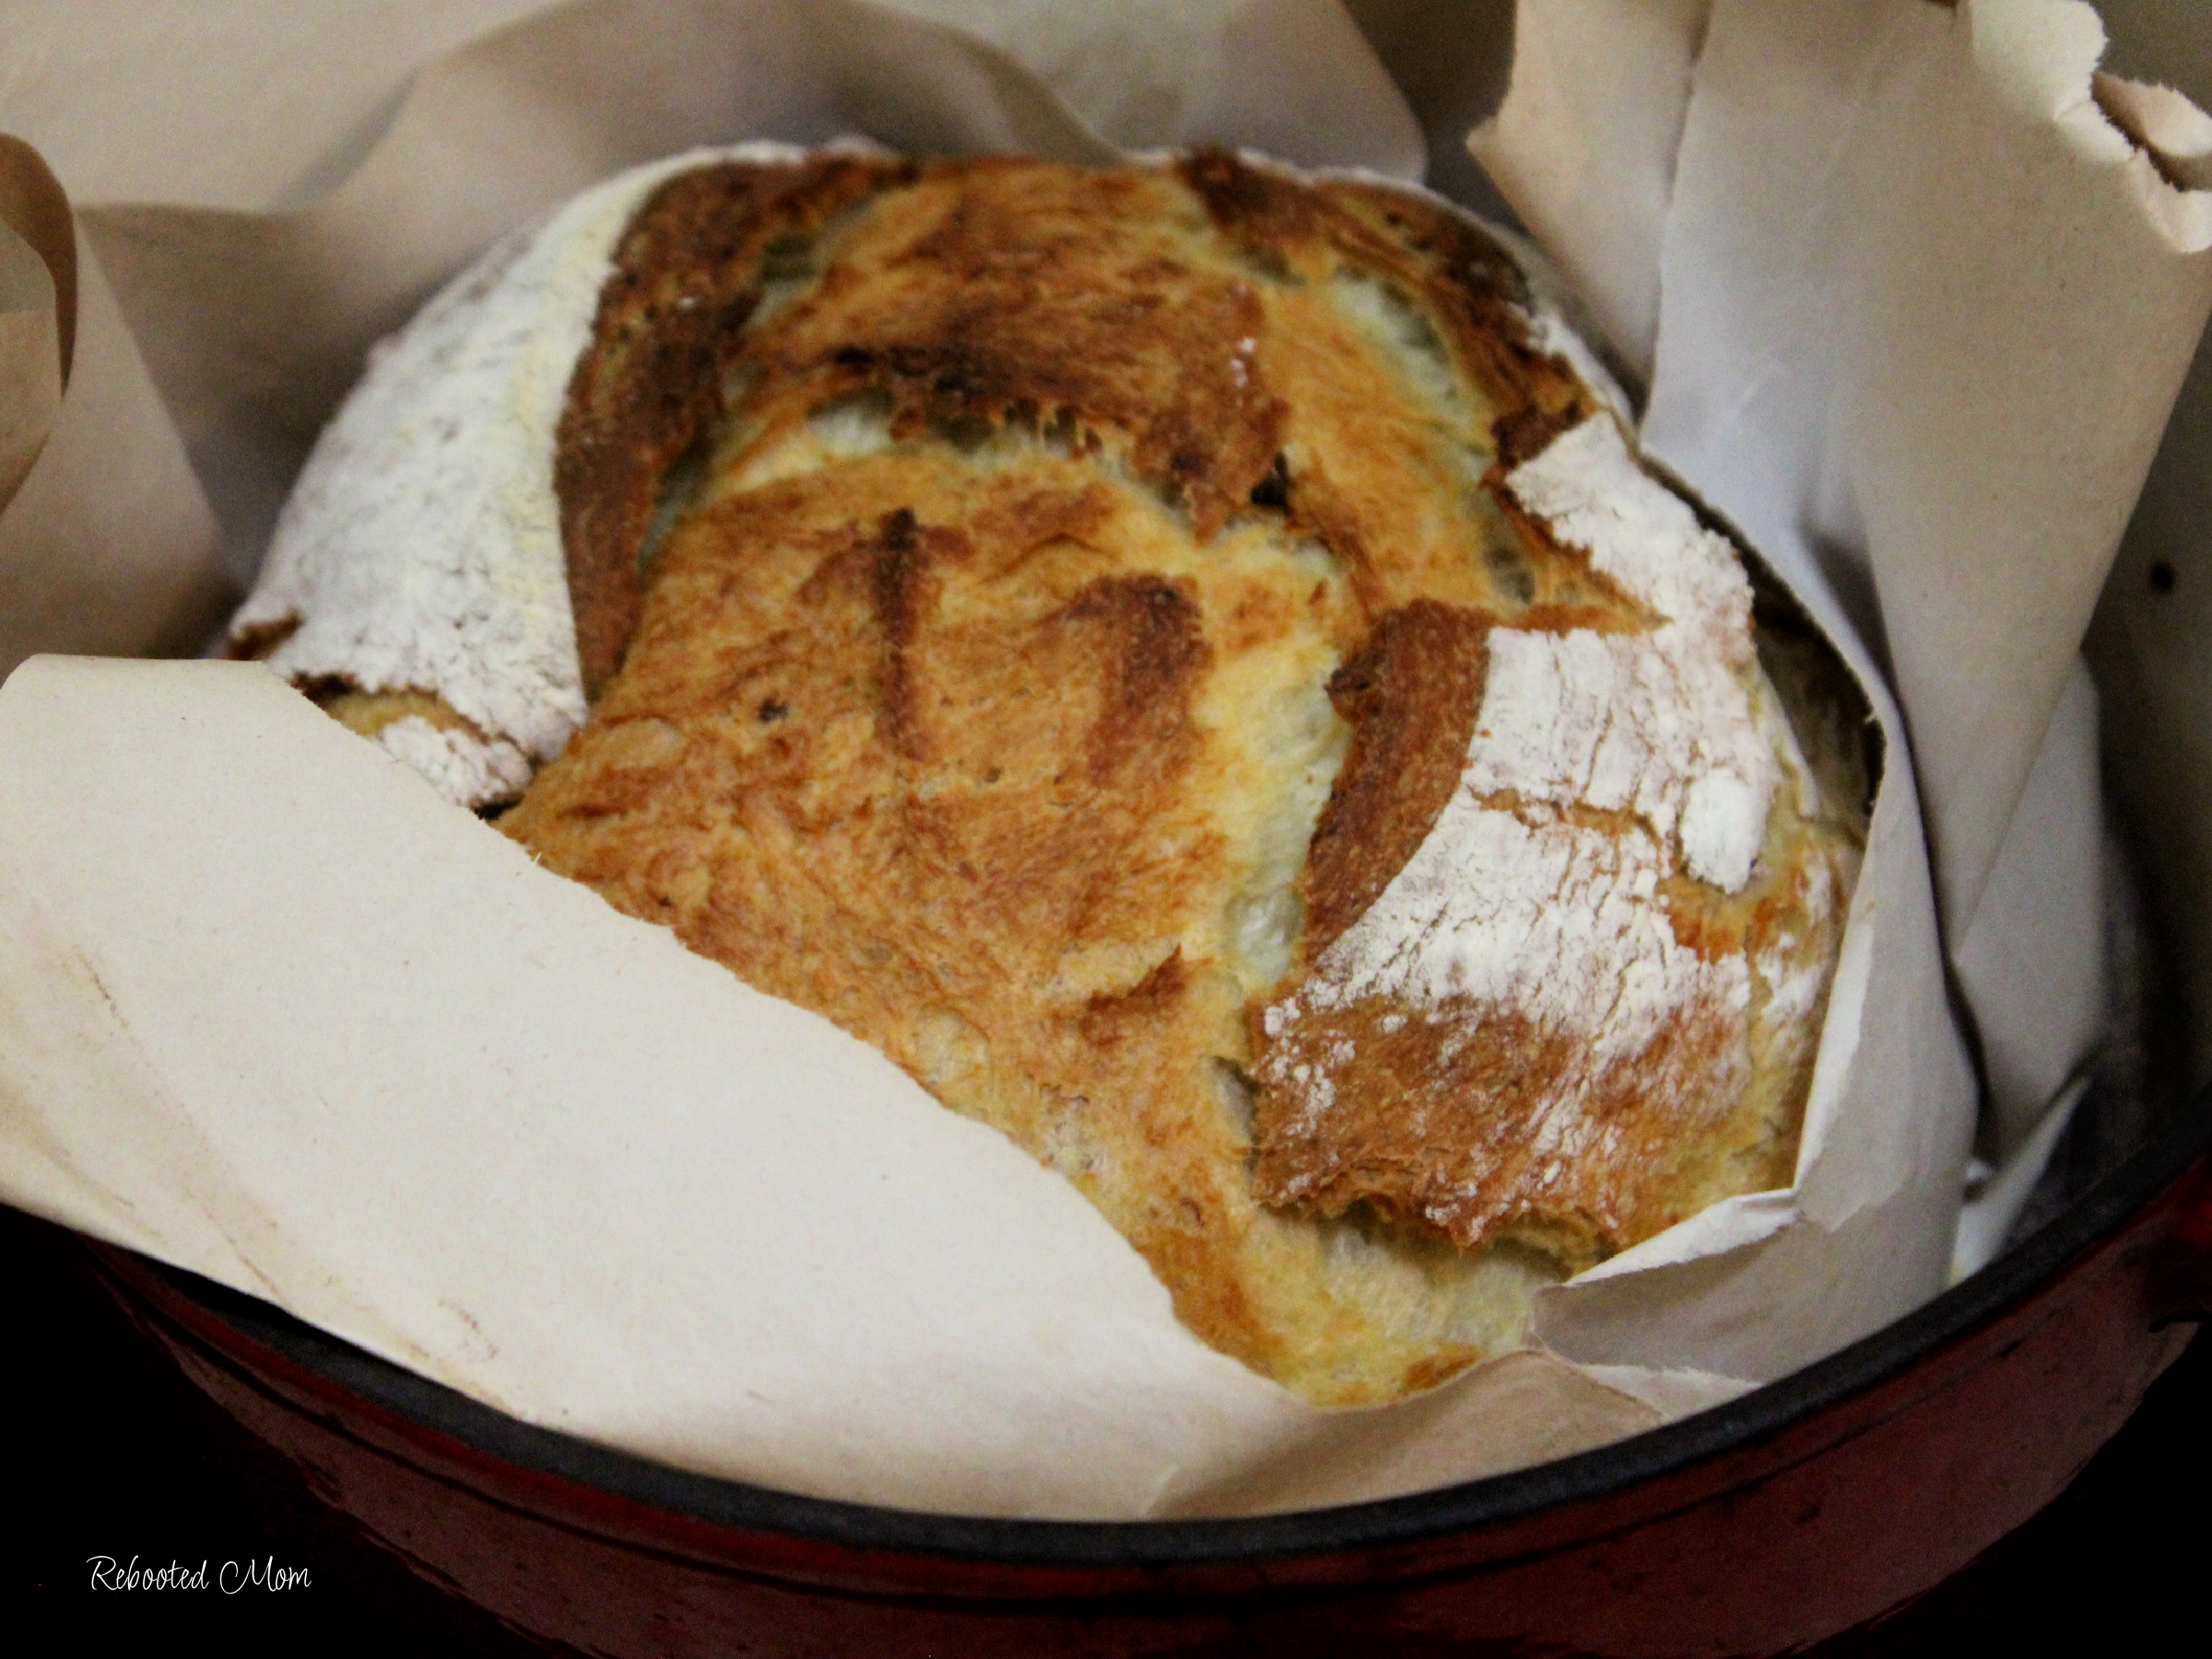
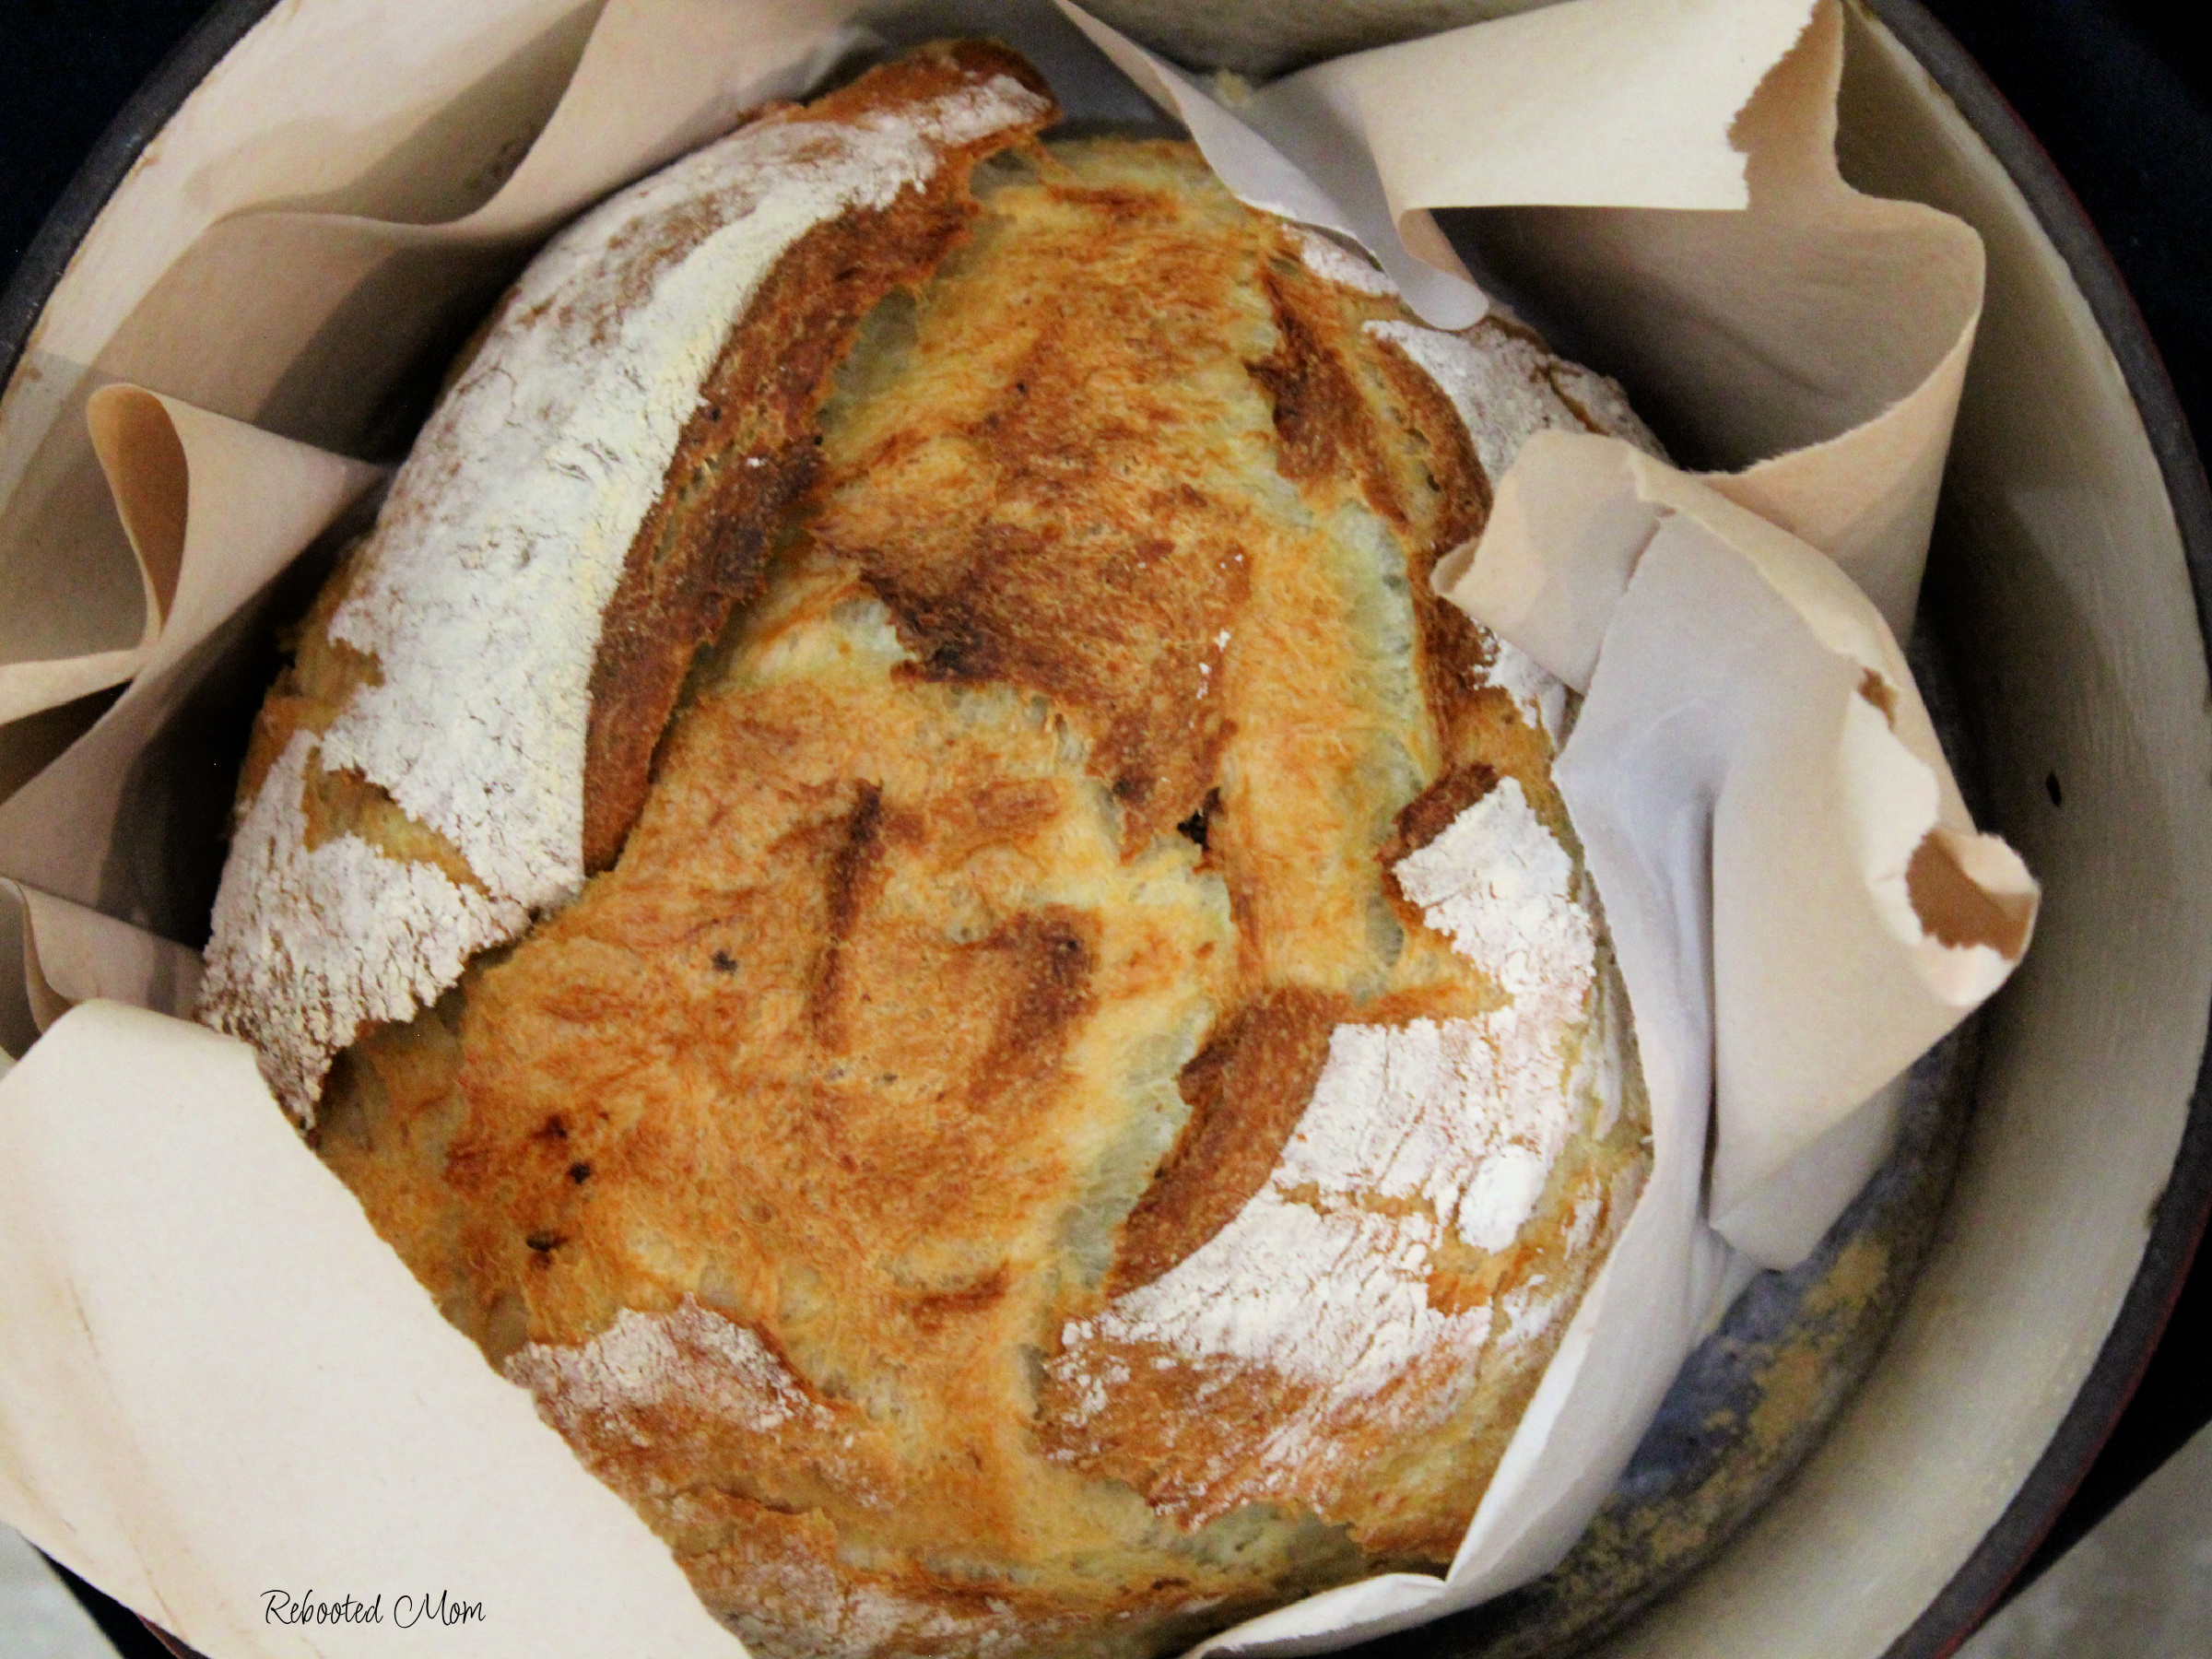
Moving quickly, remove the Dutch oven from the oven with oven mitts. Remove the lid. Use both hands to lift the parchment paper from each side and set the parchment (with the dough on it) in the pot.
Using oven mitts, place the lid on the Dutch oven and place the pot in the oven. Bake for 30 minutes at 450 degrees F. After that time, use oven mitts to remove the lid from the pot and bake at the same temperature for an additional 20 minutes.
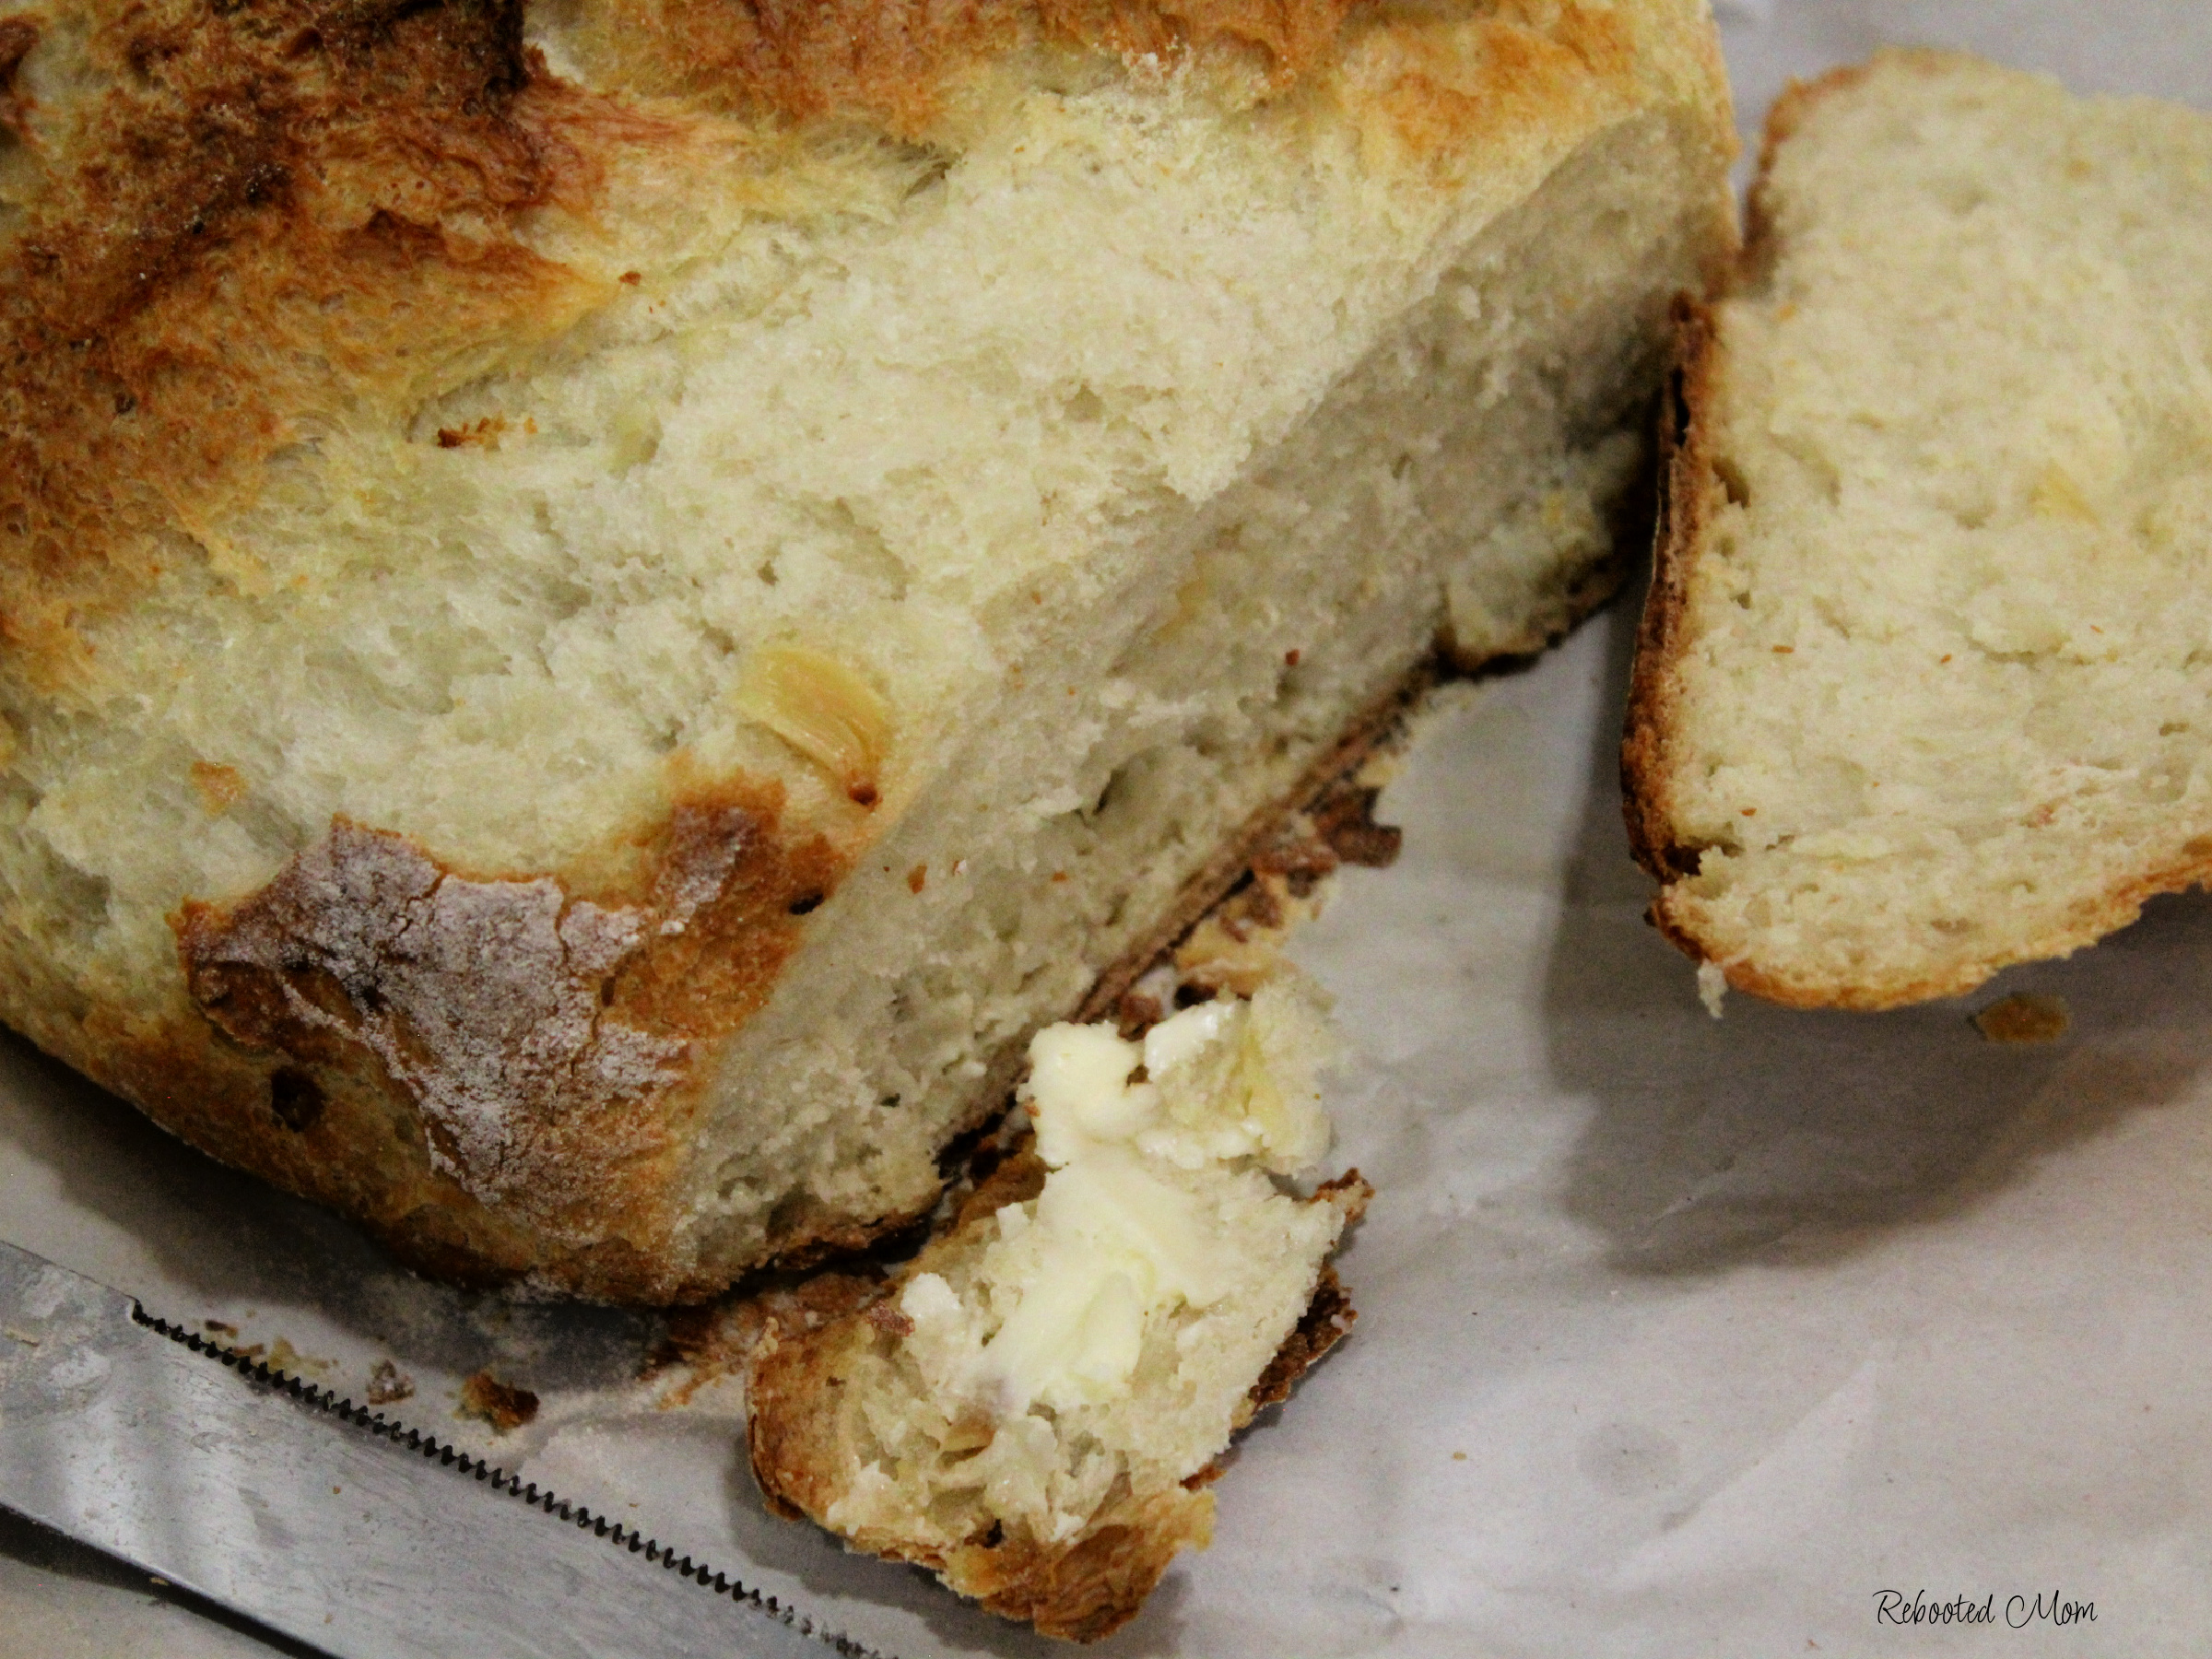
Using oven mitts, remove the pot from the oven and allow to cool before removing the bread and slicing to enjoy.
Once it’s done, it’ll have cracks that make way for the most beautiful bread you will ever have laid your eyes on! The taste is just as incredible – too!
COOL BEFORE CUTTING
Let this bread cool before cutting, then slather in homemade butter, or any type of homemade jam.
Looking for more recipes? Try any of these fun recipes:
- Very Best Bacon Jam
- Strawberry Thyme Jam
- Blackberry Apple Jam
- Old Fashioned Corn on the Cob Jelly
- Pine Needle Jelly
- Lavender Jelly
No Knead Artisan Bread
Equipment
- Dutch Oven with lid
Ingredients
- 3 C bread flour or plain, all purpose flour (450 g)
- 1 Tbsp granulated sugar
- 2 tsp rapid rise, instant or dried yeast
- 1.5 tsp salt
- 1.5 C warm water - 105-115 degrees F 375 ml
- 1 Tbsp olive oil 15 ml
Optional:
- 2 head garlic, roasted
Instructions
- Combine the water and sugar in a large bowl. Sprinkle yeast on top. Allow 2-3 minutes for yeast to react with warm water and froth on top. If it does not react, then toss the yeast and start with new, fresh yeast.
- Add the flour, salt, olive oil, and optional roasted garlic. Mix by hand or with your mixer dough hook just until combined.
- Cover the bowl with a light layer of plastic wrap and allow to sit in a warm, draft-free place for 2-3 hours or until doubled in size. Dough will be bubbly on top with some holes, and wobbly when shaken slightly.
- Place a large Dutch oven or heavy pot in the oven with an oven-safe lid. Preheat oven to 450 degrees F, 25-30 minutes before baking.
- Flour a flat surface with 2 Tbsp flour and dump the dough onto the surface. Sprinkle flour on top of the surface of the dough. Fold the dough over on itself like a letter. Then flip it over and form a rough, round shape.
- Measure some parchment paper for the pot that's in the oven. Put the paper, smooth side up, next to the dough you just formed. Carefully lift the dough ball, after forming, onto the middle of the parchment.
- Moving quickly, remove the Dutch oven from the oven with oven mitts. Remove the lid. Use both hands to lift the parchment paper from each side and set the parchment (with the dough on it) in the pot.
- Using oven mitts, place the lid on the Dutch oven and place the pot in the oven. Bake for 30 minutes at 450 degrees F.
- Using oven mitts, remove the lid and bake for an additional 25 minutes, or until loaf has lightly browned and the outside has a crusty exterior.
- Using oven mitts, remove the pot from the oven and allow to cool before removing the bread and slicing to enjoy.
Notes
Did you make this bread? If you did, please take a second to give the recipe a STAR rating and leave a comment. Did you make any changes? Did you try it with roasted garlic?

[…] flavor in just a few simple ingredients. It’s perfect on scrambled eggs, served up on toasted artisan bread – and even enjoyed on your next cheeseboard. It combines your favorite chorizo with […]