


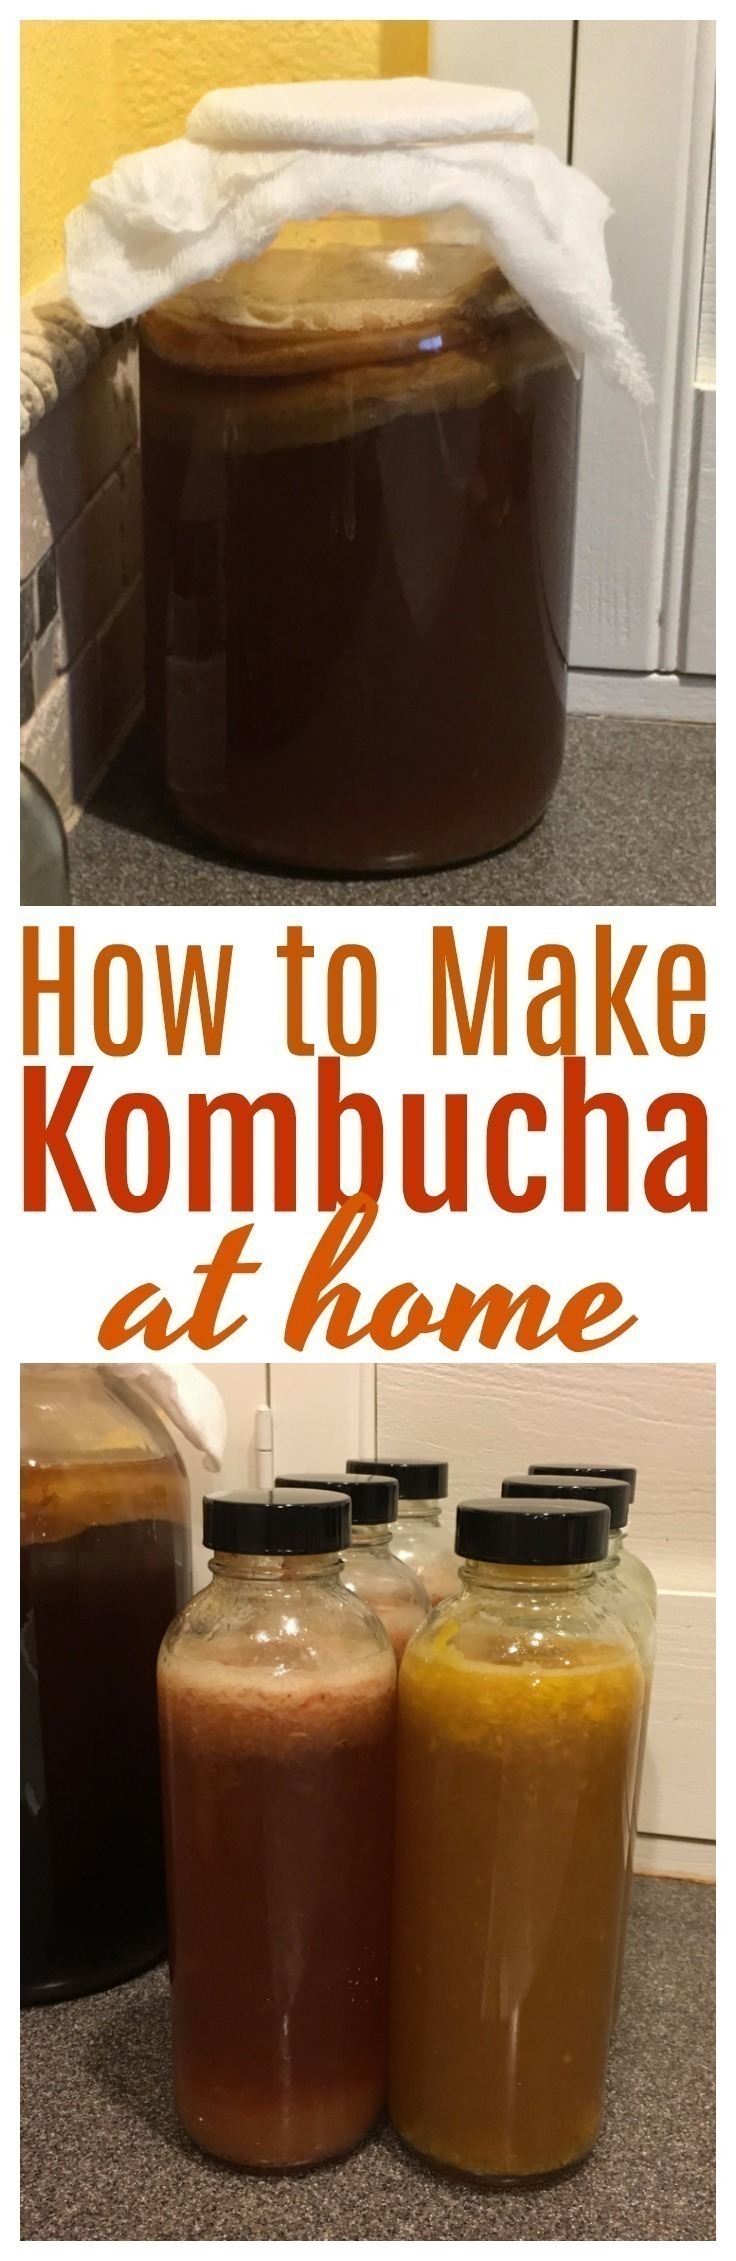
Have you been wanting to brew kombucha? If you have, you’ll probably love to know that it’s super easy to do and very gratifying. I’m going to show you how easy it is to make your own at home. It can mean a tremendous cost savings.
Kombucha is fermented using a Scoby (special culture) that converts sweetened tea into a probiotic beverage that has beneicial enzymes, vitamins and acids for your body.
What is Kombucha?
Kombucha is a raw, fermented naturally carbonated tea that has beneficial probiotics for your gut. You may know it best from the brands below:
- GT’s Kombucha
- The Brew Dr.
- Kevita
- Suja
And over a half dozen more, but GT’s being the most popular in all of our stores here in Arizona, and it runs between $3 – $4 per bottle, depending on the brand it could possibly be more.
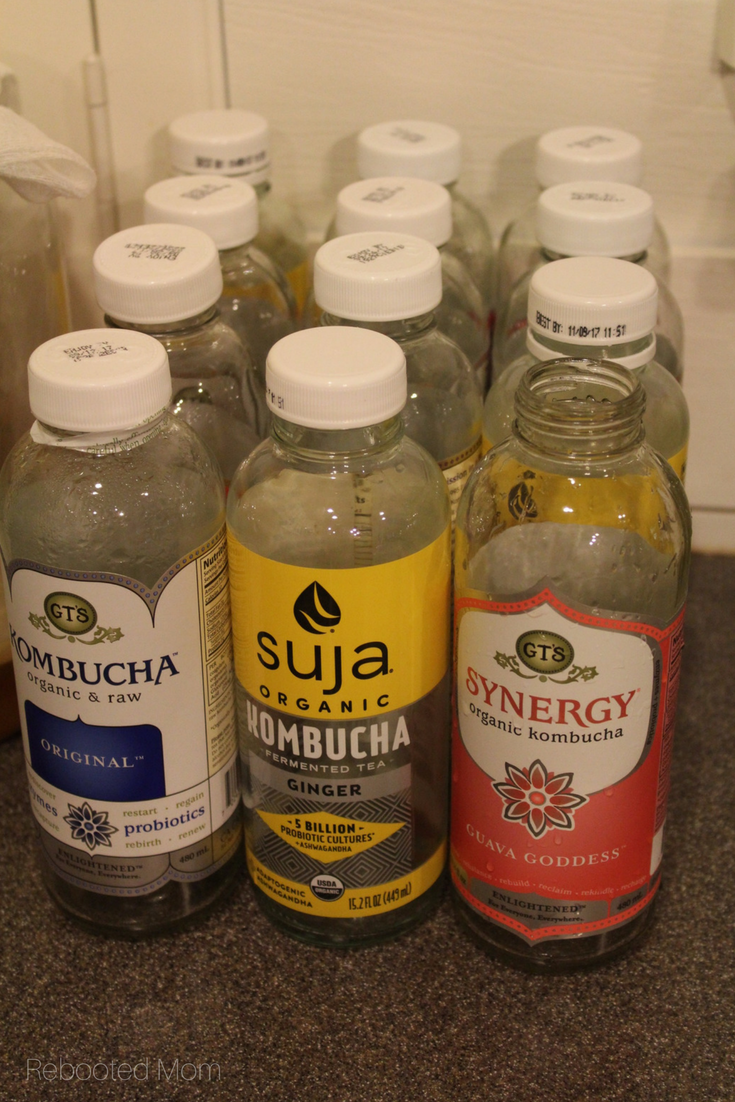
Costco sells it in a box of 6 for around $16 as well, and it’s gaining popularity as an acclaimed health beverage since it’s start in ancient China as far back as 200 BC.
Though you can buy it in store, it’s cheaper to make it yourself – especially if you drink large amounts of it or have children who do. Every single one of our 5 kids is crazy for kombucha, even the smallest, so it’s cheaper for us to make it at home.
How do you make Kombucha?
Kombucha can be made with a few simple ingredients – organic black or green tea, water, sugar, a SCOBY and a some kombucha brew from a previous batch (store bought or brewed at home). Flavors can be added later – and for those you can use organic juice or real, organic fruit. It’s really easy.
I would suggest finding a reputable source for unflavored, organic tea – I pick mine up at Vitacost, they have organic black or green tea in a 100 ct box for just $5.00.
What is a SCOBY and how do I find one?
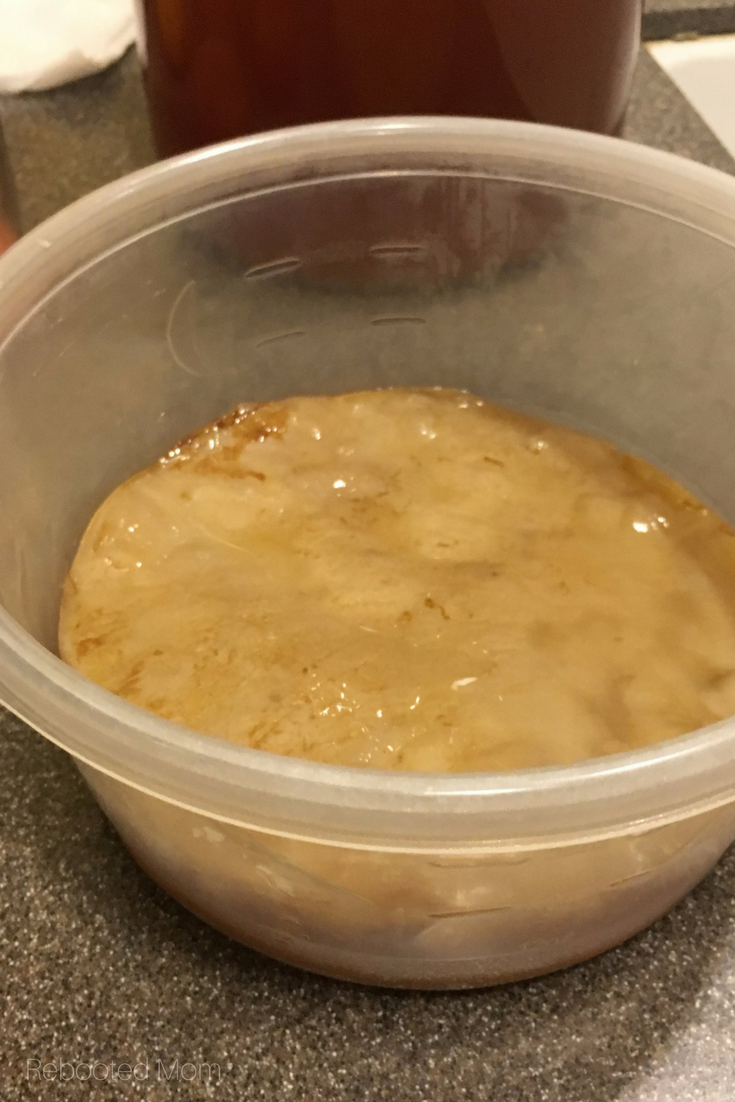
A SCOBY is a symbiotic colony of bacteria and yeast that is used to make kombucha – it actually looks like a dense, rubbery (ugly) disc that you throw in your kombucha as it brews.
When you start making kombucha, you have a few options for a SCOBY:
- Find a friend or neighbor who brews kombucha regularly who is willing to share their SCOBY with you.
- Grow a SCOBY from scratch
- Pick up a SCOBY starter culture online (I recommend Cultures for Health but you can also find them on Amazon)
We opted to make our own from a single bottle of unflavored raw, organic kombucha in the store (which was about $3). It would have been $ 7- $8 + shipping to buy a starter online, but because Arizona is hot in the summer with temps over 110 degrees I was iffy about buying a starter and having it sent by mail.
Growing your own is pretty simple, it just takes a few weeks of waiting before the SCOBY is large enough where it can be used for it’s first batch of kombucha. A SCOBY reproduces (has babies) and it will thicken with each batch of kombucha you make.
Even more… if you throw that SCOBY into a vessel that’s larger than the SCOBY itself, it will grow and expand to the circumference of that container.
How to Make Kombucha at Home
Believe it or not, making your own kombucha at home is incredibly easy and can take anwhere from a week to two weeks to prepare. You can make anywhere from a few cups to a gallon at a time (or more, but continuous brew kombucha is a separate post altogether!)
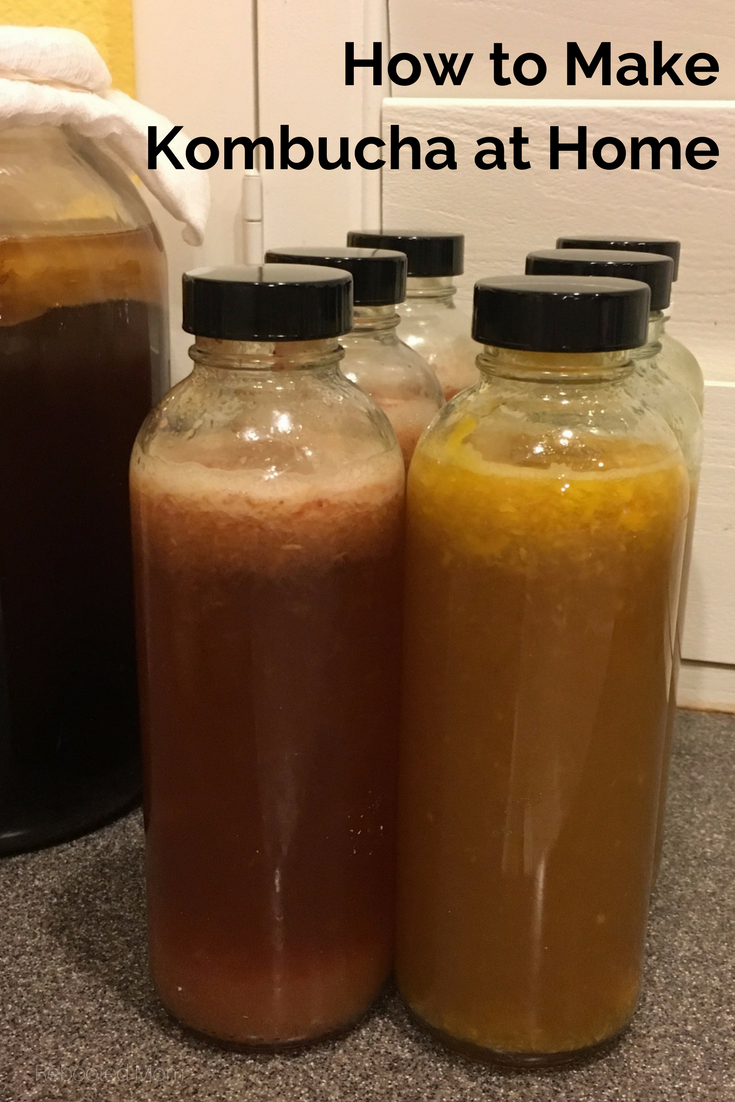
We’ll show you how to make a gallon at a time, which will produce for you (6) 16 oz bottles of Kombucha.
What you’ll need:
- 13-14 C. water
- 8 organic black or green tea bags (or you can use looseleaf)
- 2 C. kombucha from a previous batch or, 2 C. white distilled vinegar
- 1 Kombucha SCOBY (purchase a starter or grow one from scratch)
- 1 C. sugar (preferably organic, cane sugar) – you do not want to use honey
- 1 gallon jar (does not need to have a lid) + a cheesecloth (available from the dollar store)
Directions:
Begin by making sure your area is completely sanitized – including your hands. Always wash your hands with water (avoid using soap because it will kill the SCOBY).
#1: Mix the water and sugar in a pot on the stove and bring to a boil. Turn off the heat and ensure that the sugar is dissolved – add the loose tea and cover. Allow the tea to steep for 15-20 minutes, then remove the bags.
#2: Let the tea cool to room temperature.
#3: Pour your cooled tea into your gallon glass fermentation vessel along with the 2 C. of kombucha from a previous batch (or, plain white, distilled vinegar). You will want to use a glass jar, avoid a plastic container or anything with metal – make sure that it is clean.
#4: Gently add the SCOBY to the tea with clean hands – it may float or it may sink, it really doesn’t matter. Whatever it chooses to do, it will likely grow a new baby SCOBY on the top of your vessel over time and multiply.
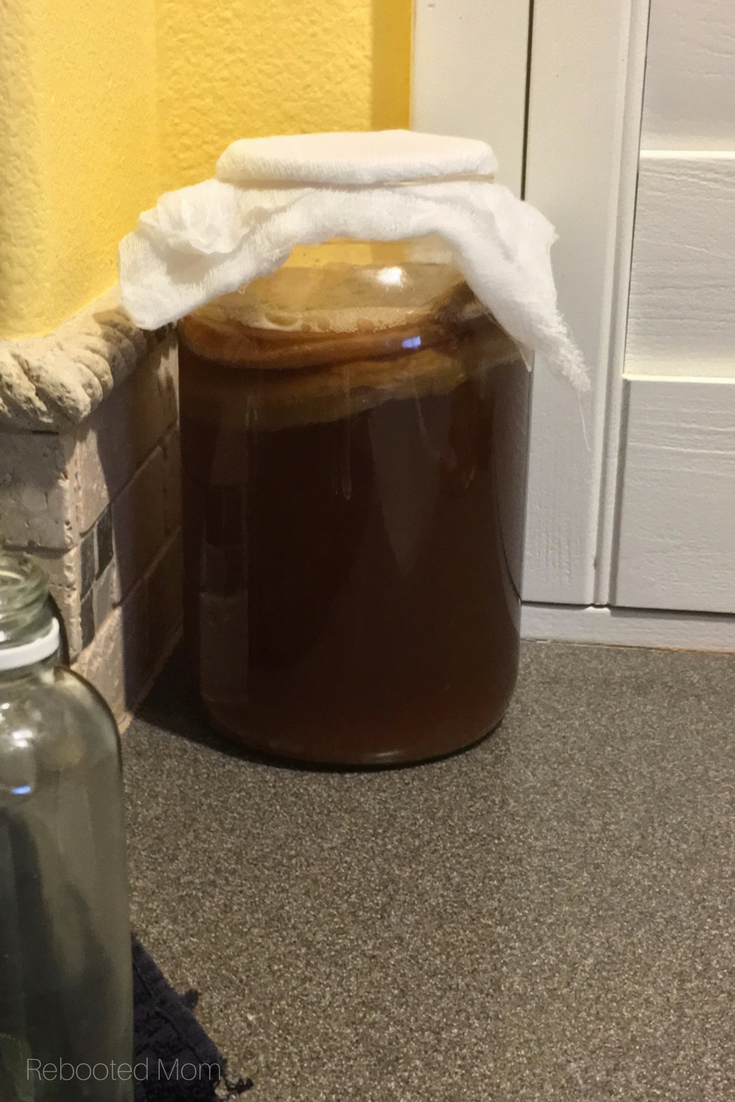
5. Place a cheesecloth over the top of your SCOBY with a rubber band to keep it clean and free from fruit flies. Let that mixture sit for 7-14 days in an area that’s warm and out of direct sunlight. You want to choose an area that allows it to sit, undisturbed – I use the back of my windowsill with the blinds closed because kids can’t reach it.
Allow that Kombucha to sit for a week or two to ferment – the warmer the temps in your kitchen, the quicker that ferment will happen (7 days vs 14).
Once you get to the point where you are happy with your ferment (7-10 days usually, the longer you wait the more acidic it gets), then it’s time to bottle. I usually bottle after 7-8 days. (You can test the flavor by dipping in a clean straw and picking up a tiny bit of liquid – just make sure to use a clean straw every time you take a taste test).
Bottling your kombucha is what gives it the carbonation that it has in commercial, store purchased kombucha. For bottling, you can clean and reuse old store bought kombucha glass bottles or you can buy these vintage kombucha bottles on Amazon.
We kept our store bought kombucha bottles over a period of a week or two and collected 24 bottles – it sounds like a lot but remember.. we have 7 in our family who loves to drink it, so bottles add up quickly.
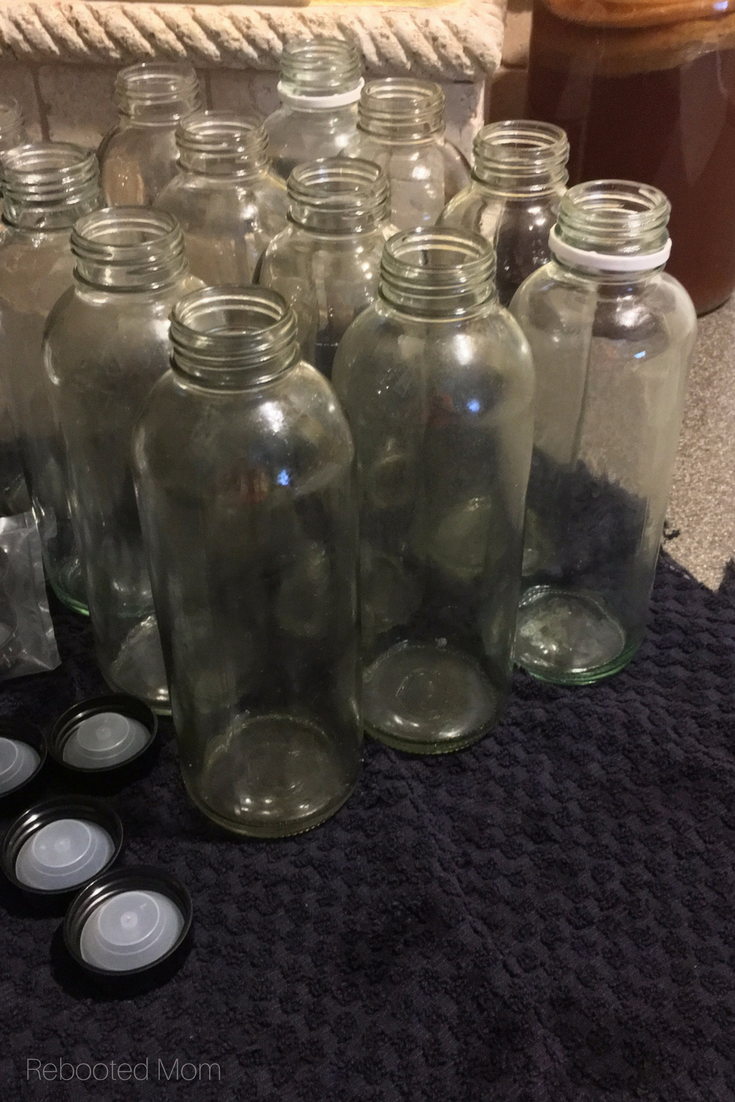
We filled up our empty bottles with very hot water and peeled the labels off – gave the outside a good scrub with a little lemon juice to remove the sticky part and allowed them to dry completely before using. Equal parts of Coconut Oil and baking soda work well too.
We did keep the caps, but over time, the threads wear down on the caps and the kombucha will loose it’s carbonation – so we bought new replacement caps over at Kombucha Kamp which have a seal that helps to keep the carbonation in check.
How to Bottle and Flavor Kombucha
When I am ready to bottle kombucha, I always try to have a batch of tea (above) that is ready and cooled so that my SCOBY isn’t sitting out too long. Not to mention I want to get my next batch going asap – you can do the same too.
Once your kombucha is ready, with clean hands, lift out the SCOBY and set it in a dish temporarily on the counter. Then pour out 2 C. of kombucha from your vessel and put that in the same dish as your SCOBY – keep the liquid + SCOBY for your next batch.
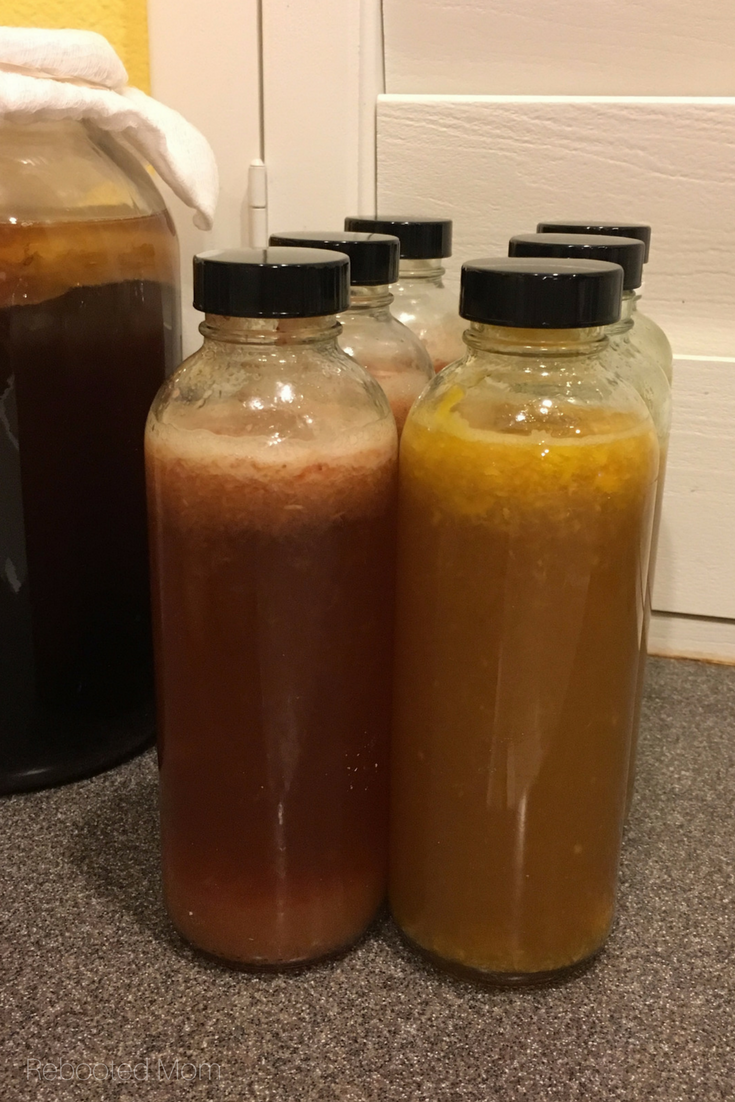
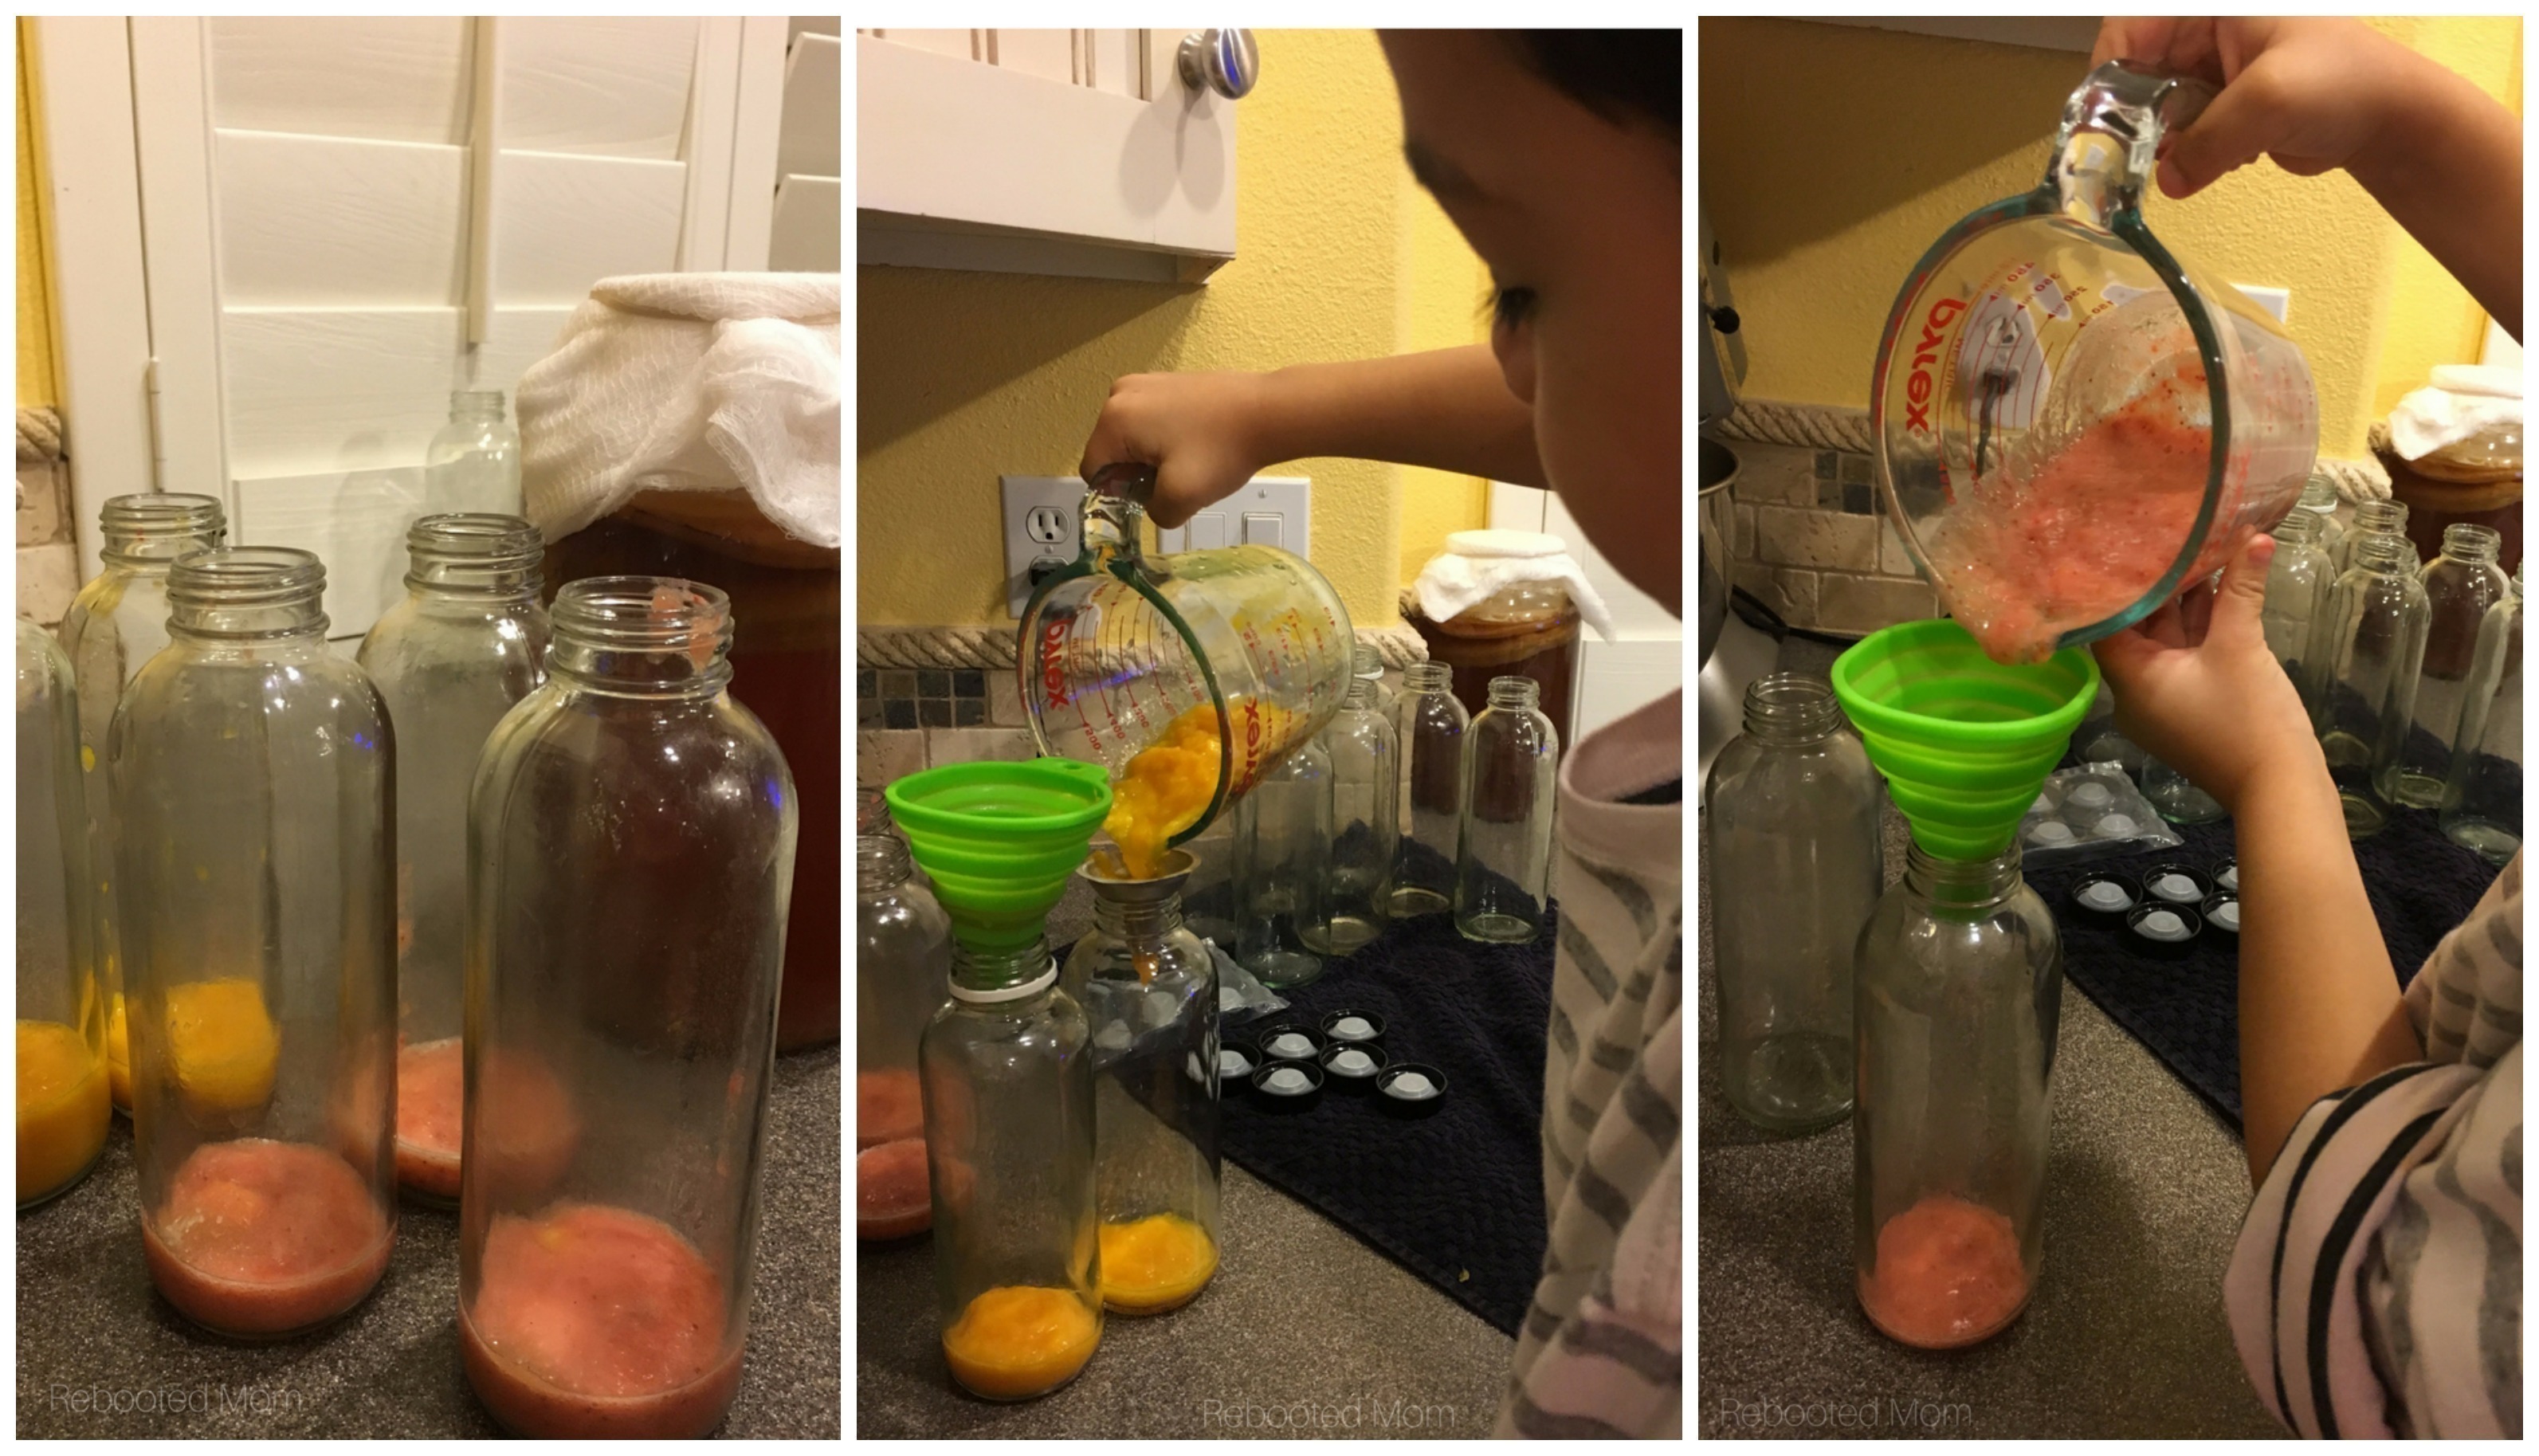
Pour the rest of your fermented kombucha into bottles (a measuring cup with a spout or a funnel work well for this). Fill each bottle with 2/3 kombucha and the other 1/3 with fruit juice.

When you flavor your kombucha, use 100% fruit juice or, opt to puree fresh or frozen fruit with a little water.
I love using mangos, strawberries, pineapple and ginger – so good! Once pureed, add that to your kombucha bottles (2/3 kombucha + 1/3 juice ratio).
Cap each tightly (reusing the caps on GT’s bottles works for a batch or two but then after that they threads will wear, so invest in these replacement caps from Kombucha Kamp).
Let your kombucha sit at room temp for 2-5 days – the longer they sit the more intense the flavor and the more carbonation they will have.
After a few days, move them to the fridge to chill. I usually move mine after 2 days.
What Do I Do With My SCOBY?
Before you bottle your existing SCOBY, you can brew your tea and add sugar beforehand, and allow it to cool – that way, once you are done bottling you can put your cooled tea, 2 C. of starter from the previous batch and your SCOBY back in the gallon vessel and start a new batch.
But.. if you don’t have tea ready and cooled, store that SCOBY in a dish with 2 C. of starter tea from your last batch and keep it at room temperature.
Your SCOBY will have babies…
The kombucha SCOBY will multiply over time and have babies – in fact, once you toss it back in your vessel, if it sinks a bit, your SCOBY will develop a new baby over the top of your kombucha. Eventually it will have more babies – feel free to pass on these babies to friends or family.
I would suggest waiting until the baby is 1/4″ or thicker before using it to make your first batch of kombucha.
How do I separate a baby from it’s mother?
Try to find the point where they joined and started a new SCOBY and gently pull – if you can’t separate, then keep your SCOBY conjoined – it will grow over time and if you do get separate formations you can keep them in a SCOBY hotel. Or pass along to anyone who wants to take one off your hands using Craigslist or Freecycle. You can also compost an extra SCOBY.
Other Kombucha Brew Questions
Making kombucha for the first time can be very daunting – but it’s incredibly easy. When you start, it’s common to have questions – here are a few popular questions answered:
Can I use regular flavored herbal tea for making kombucha?
When making kombucha at home, you should stick to regular black or green tea for the first 4 batches- at least until your SCOBY develops. Green tea, white tea, black tea and oolong tea are great choices – but if you do opt to use an herbal tea, always throw in a few bags of the black or green to make sure your SCOBY is getting the nutrients it needs.
How much sugar is left in kombucha?
The sugar is there in kombucha for the kombucha to consume – not for you. When it’s done, kombucha has 2-6 grams per 8 oz of beverage. In comparison, orange juice has 24 grams per 8 oz.
What if I don’t have starter kombucha for my first batch?
If you buy a SCOBY starter online from Amazon or Cultures for Health, you will automatically receive starter tea for your first batch with your order. If you decide to make your own SCOBY from scratch (using this DIY here), then keep back some of the tea for your first batch once your SCOBY is developed at least 1/4 inch thick if not more.
Or… you can substitute white, distilled vinegar for your first brew – if you are making a gallon vessel, you will need 2 C. of starter tea, or 2 C. vinegar.
Have you made kombucha? What are your favorite flavors?

Thank you! This article is so helpful! I just made our first batch from the dehydrated SCOBY we bought from Cultures for Health. I had a lot of questions, and feel you answered most of them! 😃 I was a bit confused bc the directions I received said to dampen the cheese cloth, but it seems most people aren’t doing that and that it would attract more fruit flies. Do you have any suggestions in re: to this?
I wouldn’t dampen the cheesecloth – but that’s just me! That may attract fruit flies! I never dampened mine. I have also used coffee filters too… the flowery lookin ones that are unbleached. I’m actually making another SCOBY now and am using that, rubber banded around the neck of the jar. So glad you found my post helpful! Good luck with your SCOBY, making Kombucha is so much fun.